Jump to:
Timber, including logs, tends to draw in moisture and can become prone to dampness under favourable conditions. It’s these ‘favourable conditions’ that you need to take control of to prevent any potential damage to your log cabin’s structure. Here’s how.
Insulate Your Log Cabin

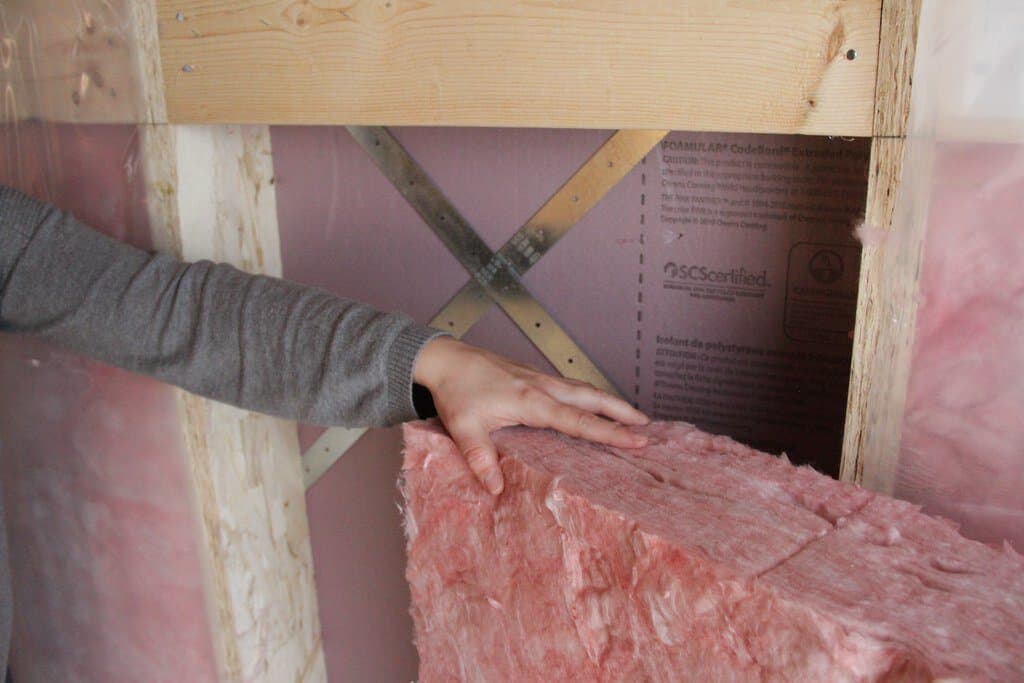
Heat retention is an effective deterrent to dampness, and the best way to conserve it is with insulation. Insulation is a material that creates a barrier, trapping warmth inside and reducing the chances of dampness forming. In a log cabin set-up, it slows down heat transfer, thereby keeping the temperature more stable. This means the cabin can stay warm in winter and cool in summer.
Which parts of the log cabin should I insulate?
The walls, roof and ceiling, and floor are the important areas of your log cabin that need insulation. Additional areas worth considering are the windows and doors.
Spray foam, foam boards, or mineral wool are great options. Start with the walls, and extending your choice of insulation to the roof or ceiling will prevent heat from escaping upwards. Installing floor insulation under the cabin’s floorboards and between the floor joists makes a difference.
If gaps have formed around the windows and door, these openings can also let in drafts and moisture. Weatherstripping does the job, whether you’re sealing them for the first time or replacing the worn-out seals. Get all the tips and tricks you need in this guide: How to Find and Fill Gaps in a Log Cabin
Note: Professionals usually handle more technical parts like spray foam insulation. It’s a good idea to consult if the work is beyond your expertise.
Ventilate Your Log Cabin

Poor ventilation is another condition that moisture and condensation find favourable. Through proper ventilation, however, air can flow freely throughout the space. It helps expel warm, moist air and brings fresh air from outside. Ventilating doesn’t have to be expensive, either. In fact, it can save you money on costly repairs that might arise from dampness or mould.
What are my options for ventilating my log cabin?
Your log cabin windows are there for a reason—so use them! Open them for 10 to 30 minutes a few times a day to invite fresh air through. The best times are usually in the morning or evening when the outdoor temperatures are cooler.
Just be mindful not to open the windows on really humid days. You’ll know it’s humid when you see condensation on the outside of your cabin or when the air feels heavy and muggy. And in those cases, airing out the cabin might only let more moisture in instead of helping.
Another simple way to improve ventilation is by fitting passive vents on your log cabin’s walls or roof. They’re inexpensive to set up and don’t need much upkeep. Or consider extractor fans—these are great for getting rid of excess moisture. They’re pretty budget-friendly, too, and you can place them in areas where humidity tends to build up the most.
Heat Up Your Log Cabin
By this, we mean adding an extra indoor heating source inside your log cabin, especially if you plan to use it throughout the year, including in the winter. Insulation helps to retain heat, but it doesn’t generate warmth on its own. Cold spots can form, and that’s when moisture can start to seep in. Enter heaters or similar options, such as:
Electric stove heaters

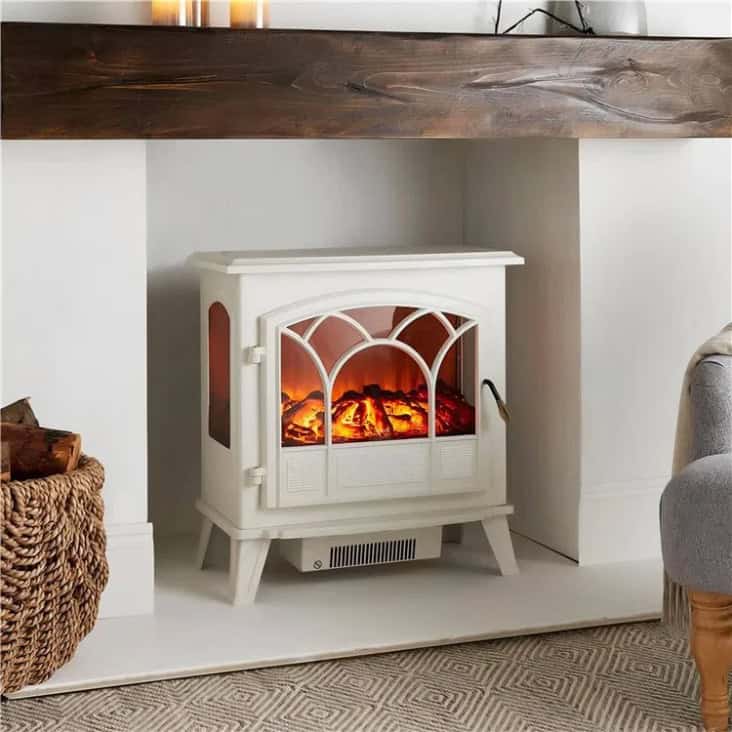
Electric stove heaters warm rooms by converting electricity into heat through resistors that emit radiant energy. Most feature modern faux log burner designs, mimicking a classic stove without the dangers of a real fire. Plus, you can enjoy the warmth and glow of a log burner stove without the hassle of installation and maintenance.
Take this electric stove heater, for instance. It’s designed to look like a traditional stove, with a cast-iron exterior and an LED display screen for a log fireplace. It doesn’t get as hot on the surface as a traditional wood stove, so it’s safe even when kids are around. However, we recommend placing it out of reach of little ones for added safety.
Infrared panels
Infrared panels heat a room by emitting infrared rays, similar to the heat from the sun. The rays bounce around the room, warming the surfaces they hit rather than heating the air. They don’t give off any UV light, making them safe to use.
The panel can be mounted on the wall or ceiling using a bracket and then plugged into an electrical outlet to start working. Always follow the manufacturer’s installation instructions. If you’re not confident with electrical work, it’s best to get a qualified electrician to install it.
Fan heaters
Fan heaters work by using a fan to blow air over a heat source. The air picks up warmth from the element and circulates it around the room. These fans are also compact, perfect if you have a small log cabin or only need a light heat source.
Wood stoves
Wood-burning stoves are self-contained heating sources that produce indoor heat through wood combustion. The heat is quite powerful and can keep a bigger log cabin warm for hours, depending on how many logs you use.
A wood stove usually comes with a chimney to vent smoke outside. Installing one may require some serious modification, like creating a hole for the smokestack. And, of course, you’ll need a supply of dry, seasoned wood in your log store for burning – so be prepared for that!
Electric and oil-filled radiators
Electric radiators are standalone units with either thermal fluid or dry elements that heat up and release warmth into the air. Meanwhile, oil-filled radiators use an electrical element to heat thermal oil inside the unit. Once warmed, these radiators provide steady, long-lasting heat.
Tip: Place your radiator along an exterior wall or near a window but not too close to anything flammable, like curtains. Also, make sure it’s not blocked by furniture for optimal airflow.
There are plenty of indoor heating options to choose from, but the ones mentioned above are a great place to start. Another helpful tip is to position your heater in a central spot for even warmth and avoid placing it near windows or doors where heat could escape!
Possible Causes of Damp in Your Log Cabin
Dampness happens when too much moisture builds up, and it can come from things like:
- Roof leaks: A leaky roof lets rainwater in, leading to dampness. Even small leaks can let in a lot of moisture over time, which can encourage mould and mildew if not dealt with.
- Rising damp: This happens when moisture from the ground moves upwards. Poorly sealed foundations or direct contact with damp soil can cause this issue.
- Window damage: Cracks, gaps, or damaged seals around windows can let moisture in, particularly during rainy or humid weather.
- Rain and groundwater ingress: Heavy rainfall or flooding can lead to water seeping into the cabin through the walls or foundation. This can be made worse by poor drainage or incorrect site grading.
- Condensation: When warm, moist air meets cooler surfaces, it turns into liquid water. This can build up on walls, ceilings, and other areas, leading to mould growth.
Mould vs mildew
Mould is a type of fungus that thrives in damp, poorly ventilated spaces. Poorly ventilated log cabins often create the perfect environment for mould spores to grow on the logs, leading to ‘black mould’.
Mildew is a type of mould, but not the other way around. It’s a living organism that grows where there is warmth, dampness, and humidity.
Roundup
A combination of insulation, ventilation, and the right heater is all it takes to keep damp and moisture out of your wooden garden room. And even if you own an insulated log cabin, it’s worth considering all three for better protection and long-term durability.
Discover more ways to look after your log cabin in our log cabin maintenance guide.


